こんちにわ。やすひでおです。
Pythonを使ってカッテネフォーマットを自動生成するプログラムを作り始めて、もう5回目です。
いつになったら完成形が見れるんだ!っていうお叱りの声が聞こえてきそうです。
もう少し、お付き合いください。
過去の制作過程をまだ見ていない方は、是非見てみてください。


前回は、スクレイピングの実践を行いました。
今回は、スクレイピングで取得した情報と、フォームから取得した情報を整形していきます。
では早速作っていきましょう。
Let's Start Python!!!
正規表現で変数の値を整形
前回ようやく、サイトからアフィリエイト用のリンクを作成することが出来ました。
作成したリンクを変数に代入出来ているので、実際のフォーマットにあてはめられるように正規表現で整形します。
以下の値が変数(raw_source)に入っています。
<a href="//af.moshimo.com/af/c/click?a_id=2078482&p_id=170&pc_id=185&pl_id=4062&url=http%3A%2F%2Fwww.amazon.co.jp" rel="nofollow">make format by python</a><img src="//i.moshimo.com/af/i/impression?a_id=2078482&p_id=170&pc_id=185&pl_id=4062" width="1" height="1" style="border:none;">
フォーマット用に欲しい値は以下の赤色部分になります。
<a href="//af.moshimo.com/af/c/click?a_id=2078482&p_id=170&pc_id=185&pl_id=4062&url=http%3A%2F%2Fwww.amazon.co.jp" rel="nofollow">make format by python</a><img src="//i.moshimo.com/af/i/impression?a_id=2078482&p_id=170&pc_id=185&pl_id=4062" width="1" height="1" style="border:none;">
欲しい部分は変数の途中から始まり、途中で終わっているので、抽出が必要だと判断しました。
抽出するために、正規表現を用いました。
import re
source = re.findall('<a href=(.*) rel="nofollow".*', raw_source)
正規表現操作を可能にする「re」という標準ライブラリをインポートしています。
「<a href=」から始まり、「rel="nofollow".....」までの部分を抽出することになります。
正規表現
ドット「.」は、任意の1文字を表します。
アスタリスク「*」は直前の1文字の0回以上の繰り返しを表します。
括弧「()」で囲むと文字列の抽出が出来ます。
そのため、「(.*)」は丸ごと抽出することになります。
あとは、どこからどこまでを抽出するかになりますので、「'<a href=(.*) rel="nofollow".*'」という表現になります。
rel="nofollow"の後も、文字列が続いているので、「.*」を付け忘れないように。
ついにカッテネフォーマットの作成
遂にカッテネフォーマット作成に必要となる要素が全て揃いました。
もう一度カッテネフォーマットを確認しておきます。
- イメージ画像のURL
- タイトル
- 作者名など
- ボタンの色
- ボタンを押したときの遷移先URL
- ショップ名(Amazonなど)
- イメージ画像を押したときに遷移先にするか
5.ボタンを押したときの遷移先URLがスクレイピングで取得したものになります。
他の要素は、入力フォームから取得したものになります。
# カッテネフォーマットを表示するウィンドウを定義
format_window = tkinter.Tk()
format_window.title('Kattene Format')
format_window.geometry('600x700')
# フォーマットに必要な情報を取得
get_image_link = image_link.get()
get_title_text = title_text.get()
get_description_text = description_text.get()
link1_color = link1_cb.get()
link1_text = link1_text.get()
# テキストボックスを定義
source_text = tkinter.Text(format_window, height=50)
source_text.grid(column=0, row=0)
# ヘッダー部分
source_text.insert('end' , '[kattene]\n{\n"image": "')
source_text.insert('end' , get_image_link)
source_text.insert('end' , '",\n"title": "')
source_text.insert('end' , get_title_text)
source_text.insert('end' , '",\n"description": "')
source_text.insert('end' , get_description_text)
source_text.insert('end' , '",\n"site": [\n')
# リンク部分
source_text.insert('end' , '{\n"color": "')
source_text.insert('end' , link1_color)
source_text.insert('end' , '",\n"url": ')
source_text.insert('end' , source)
source_text.insert('end' , ',\n"label": "')
source_text.insert('end' , link1_text)
source_text.insert('end' , '",\n"main": "true"\n')
source_text.insert('end' , '}\n')
# フッター部分
source_text.insert('end' , ']\n}\n[/kattene]')
format_window.mainloop()
それぞれ見ていきます。
# カッテネフォーマットを表示するウィンドウを定義
format_window = tkinter.Tk()
format_window.title('Kattene Format')
format_window.geometry('600x700')
~~中略~~
format_window.mainloop()
こちらは第1回、第2回とGUIを作るときに出てきたものと同じになります。
Kattene Formatというウィンドウでサイズが600×700となっています。
# フォーマットに必要な情報を取得
get_image_link = image_link.get()
get_title_text = title_text.get()
get_description_text = description_text.get()
link1_color = link1_cb.get()
link1_text = link1_text.get()
入力フォームの値を取得して、変数に代入しています。
入力フォームの値は、getメソッドで取得することが出来ます。
第2回で作成した入力フォームでは、イメージのURLを「image_link」という名前で定義しています。
そのため、「image_link.get()」で入力された値を取得できます。
# テキストボックスを定義
source_text = tkinter.Text(format_window, height=50)
source_text.grid(column=0, row=0)
テキストボックスを作成します。
ということで、Textメソッドを使ってコピー可能なテキストを用意しています。
# ヘッダー部分
source_text.insert('end' , '[kattene]\n{\n"image": "')
source_text.insert('end' , get_image_link)
source_text.insert('end' , '",\n"title": "')
source_text.insert('end' , get_title_text)
source_text.insert('end' , '",\n"description": "')
source_text.insert('end' , get_description_text)
source_text.insert('end' , '",\n"site": [\n')
# リンク部分
source_text.insert('end' , '{\n"color": "')
source_text.insert('end' , link1_color)
source_text.insert('end' , '",\n"url": ')
source_text.insert('end' , source)
source_text.insert('end' , ',\n"label": "')
source_text.insert('end' , link1_text)
source_text.insert('end' , '",\n"main": "true"\n')
source_text.insert('end' , '}\n')
# フッター部分
source_text.insert('end' , ']\n}\n[/kattene]')
insertメソッドで上から順に必要な情報をテキストに挿入してます。
「'end'」は最後に挿入という意味になります。
「\n」は改行という意味になります。
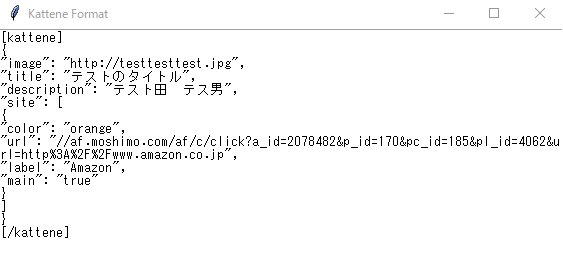
結果↓

画像と同じものを記載しています。
{
"image": "http://testtesttest.jpg",
"title": "テストのタイトル",
"description": "テスト田 テス男",
"site": [
{
"color": "orange",
"url": "//af.moshimo.com/af/c/click?a_id=2078482&p_id=170&pc_id=185&pl_id=4062&url=http%3A%2F%2Fwww.amazon.co.jp",
"label": "Amazon",
"main": "true"
}
]
}
[/kattene]
今はリンクが一つだけなので、繰り返し処理を入れていきます
最後に
いかがだったでしょうか。
第5回目として、取得した情報からカッテネフォーマットに合わせた形に出力出来ました。
次回、最終回になります。
スクリプト化して、一気にアプリっぽさが出てくるところになります。
最後までお付き合いいただきありがとうございました。
皆様の勉強のご参考になれば幸いです。
僕も一緒に勉強していきます。


